Secure SSH Access via TLS/HTTPS Proxy using stunnel
How to Bypass Institute WiFi SSH Restrictions Using stunnel
At IIT Kharagpur and many other institutes or workplaces, WiFi networks often block SSH altogether. This means you can’t git clone, deploy code, or connect to remote servers. Even switching SSH from port 22 to port 443 doesn’t help, since Deep Packet Inspection (DPI) can still detect and terminate SSH traffic.
The solution is stunnel. It wraps your SSH traffic inside TLS/SSL, making it look like HTTPS. Firewalls see a normal HTTPS handshake and encrypted packets, not SSH. Here’s the architecture and step-by-step guide.
Architecture

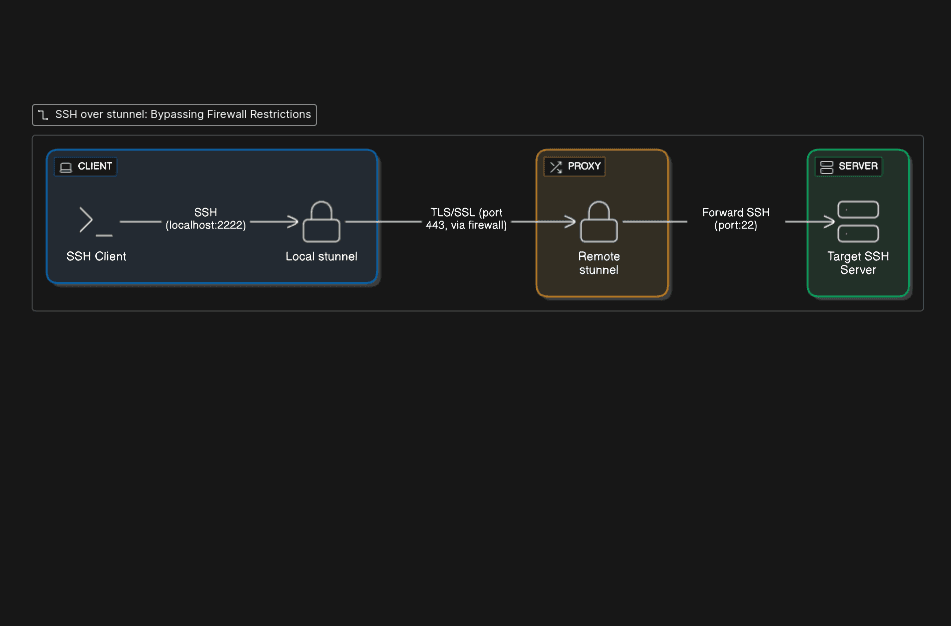
This architecture uses stunnel to wrap SSH traffic inside a secure TLS/SSL tunnel, making it appear as standard HTTPS traffic. This allows the connection to bypass firewalls that block SSH by sending it over port 443. A remote stunnel instance then receives the encrypted traffic, unwraps it, and forwards the original SSH connection to the target server.
Why this works:
Port: Firewalls must allow 443 (otherwise HTTPS breaks).
Protocol disguise: DPI sees TLS handshakes, not SSH fingerprints.
Preservation: SSH authentication and features remain unchanged.
Step 1: Server Setup ☁️
1. Provision a server
Use an AWS EC2 or any cloud VM. Open inbound TCP 443 in security groups so that it can receive HTTPS requests.
2. Install stunnel
It'll be used to unwrap incoming HTTPS requests and wrap the SSH response back to HTTPS
sudo apt update
sudo apt install stunnel4 -y
3. Generate an SSL certificate required by stunnel to work
sudo openssl req -x509 -newkey rsa:4096 \
  -keyout /etc/stunnel/stunnel.key \
  -out /etc/stunnel/stunnel.pem \
  -nodes -days 365
sudo chmod 600 /etc/stunnel/stunnel.key
4. Configure stunnel
Create /etc/stunnel/ssh-tunnel.conf:
pid = /var/run/stunnel4/stunnel.pid
cert = /etc/stunnel/stunnel.pem
key = /etc/stunnel/stunnel.key

[ssh-proxy]
accept = 443
connect = 127.0.0.1:22
5. Enable service
sudo systemctl enable stunnel4.service
sudo systemctl restart stunnel4.service
Step 2: Client Setup (Laptop) 💻
1. Install stunnel
macOS:
brew install stunnelUbuntu/Debian:
sudo apt install stunnel4Arch:
sudo pacman -S stunnelWindows: Download Installer
2. Create config
File: /etc/stunnel/stunnel.conf
client = yes

[ssh-proxy]
accept = 127.0.0.1:2222
connect = YOUR_SERVER_PUBLIC_IP:443
3. Start service
sudo systemctl enable stunnel4.service
sudo systemctl restart stunnel4.service
Step 3: SSH Config ⚡
1. Manual test
You can use this command to connect to the proxy server via stunnel and check whether stunnel is configured correctly.
ssh -p 2222 ubuntu@127.0.0.1
Note that we're connecting to localhost here. stunnel listens for SSH requests on port 2222 and forwards them to the proxy server after wrapping them in HTTPS.
2. Automate with ~/.ssh/config
This step configures all SSH requests to route through the proxy server.
Host jump-server
  HostName 127.0.0.1
  Port 2222
  User ubuntu
  IdentityFile /path/to/identity-file.pem

Host * !jump-server
  ProxyJump jump-server
Why This Works So Well
Right port: 443 is always open.
Right protocol: TLS looks like HTTPS.
Right behavior: Standard SSL handshake, no SSH signature visible.
Conclusion
With just a small setup, stunnel makes your SSH sessions look like HTTPS. Architecture is simple:
SSH → Local TLS → Remote TLS → SSH.
Now you can code, deploy, and push without your firewall even noticing.